High-stakes speed run
How to try a big-exposure case in three and a half days. Hint: Keep the story simple and organized. Here are tools to help you do that.
Brevity is the soul of wit, or so sayeth Shakespeare. Following our recent jury verdict in the matter of Gratton v. United Parcel Service, Inc., many attorneys have approached us to ask how we were able to manage our time and complete a jury trial for a racial harassment whistleblower with three years of alleged retaliation to discuss – including jury deliberations – in less than four days.
Anxiety prods us to present every piece of useful evidence, allege every potentially meritorious claim, and rebut every deflection, denial, and distraction presented by the defense. Our own anecdotal experience, and a growing body of psychological science, urges the exact opposite: The party with the simplest story is the one most likely to win.
In Gratton, we originally plotted out a ten-day jury trial, set to occur in the U.S. District Court for the Eastern District of Washington. Those plans called for the admission of 84 exhibits and the testimony of up to 33 witnesses. However, because this small-town courtroom had not experienced a civil trial in over a decade, it was impossible to know how much time we would actually be allotted at the final status conference – held a mere 12 days before the trial itself.
Because federal judges tend to impose tight time limits on jury trials in their courtrooms, we took nothing for granted. Throughout the trial-preparation process, we took numerous steps to ensure we could adapt to whatever time limit our judge might adopt. Over the course of multiple trials where the need to cut evidence has arisen, sometimes during the trial itself, we have developed systems for ranking and organizing our evidence in advance, thereby ensuring we can make cuts in a reasoned and systematic way.
Given these ranking systems being in place, we did not panic when the Court adopted the Defendant’s proposal of a mere five-day jury trial, as we might have in the absence of such systems. Rather, we went to work making the requisite cuts, and indeed we even finished early. In the end, these cuts proved advantageous, permitting us to present the simplest and most compelling iteration of our story while ensuring that the jury struck their righteous verdict while the proverbial iron was hot.
Below, we discuss our systems for organizing and ranking the evidence, including an explanation of how we use them to reduce or expand the length of our trial presentations at will.
Building and utilizing evidence databases
One of the primary jobs of a trial lawyer is to manage, organize, and present the most important evidence in a persuasive and efficient manner. In employment litigation, where the parties frequently had a series of important interactions across an extended period, in a workplace with many potential witnesses, this task can feel overwhelming.
To do this well, you must tame the data. There are numerous systems for doing this, with trial presentation software like TrialPad and TrialDirector, ESI platforms like Everlaw, and now even AI systems like CoCounsel and Claude offering some version of evidence databasing and database management.
But these tools are frequently cost-prohibitive for the aspiring trial lawyer. When we began this practice, we did not yet possess the resources for fancy user interfaces and AI-assisted document review, storyboard building, and timeline generation. Instead, we relied upon Microsoft Excel to perform all these same functions, and you can too.
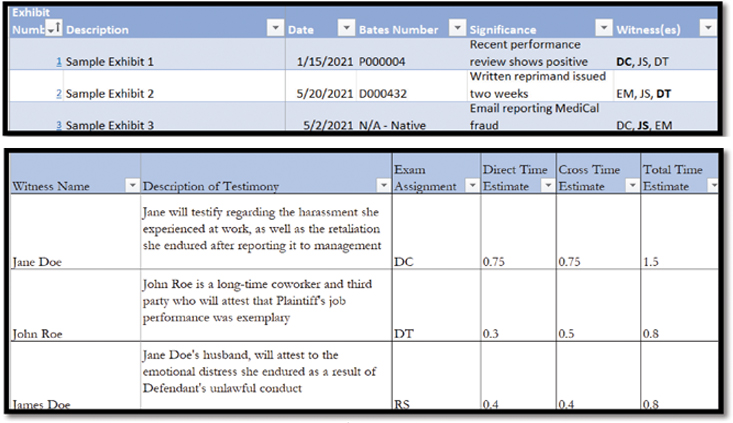
First, we organize all of the potential exhibits into a “Trial Exhibit Database,” creating a spreadsheet that lists each potential exhibit, provides a description of the exhibit and its significance, and indicates which witnesses can be used to introduce it. Here is an example of a hypothetical database from a whistleblower case (See Fig 1 on page 20).
The exhibit numbers are also hyperlinked to a PDF image of the exhibit, permitting anyone working within the spreadsheet to open any exhibit with a single click. The date column can be sorted by chronological order, thereby automatically revealing your timeline. The significance column can be used to make quick comparative decisions about which exhibits are the most important and which are cumulative or tangential. This, in turn, permits more informed and more efficient decision-making when the time comes to cut exhibits from the list.
The witness column helps you track the witnesses that can be used to admit an exhibit, and we bold-face the initials of the witness we believe to be the best fit for that purpose (while keeping the rest in case that witness no-shows, fails to lay a proper foundation, etc.) This, in turn, can help inform decisions about which witnesses are truly necessary, and which are on the potential chopping block.
Notably, we also try to admit every exhibit through the earliest available witness we can, even if we have no further questions for that witness about the exhibit. This ensures we are not compelled to call a later witness we might otherwise decide to cut. It also allows us to launch straight into our questions about the exhibit with the witness we intend to use it with later, with no evidentiary foundation distracting from the storytelling, which can make for better theater in a key cross-examination.
Notably, the above image reflects a grossly over-simplified version of the exhibit database we create. We also have columns we use to track (1) whether and when the exhibit was received into evidence; (2) related exhibits (e.g., additional emails in the same chain); (3) the defendant’s objection(s) to the exhibit (if pre-disclosed as they frequently are in federal court) and our proffer in response to those objections; and (4) perhaps most importantly, the themes and claim elements that each exhibit relates to or supports.
While these additional columns are not primarily about time management, they often help to inform decisions about what evidence is cumulative and potentially can be cut. For example, by filtering the evidence supporting different claim elements, we can quickly discern which elements have the most evidentiary support and thus the strength to withstand the deepest cuts. We can also quickly analyze which elements are weakly supported and ensure we make fewer cuts to the evidence supporting them.
Importantly, one of the great benefits of a spreadsheet database is that you are free to add or remove columns at will, so you can always supplement the template with ad hoc categories you deem useful in any particular case. At the end of the trial, our exhibit database has often evolved and morphed into something unique to the individual case, albeit with many columns that appear in them every time.
Organizing witness testimony
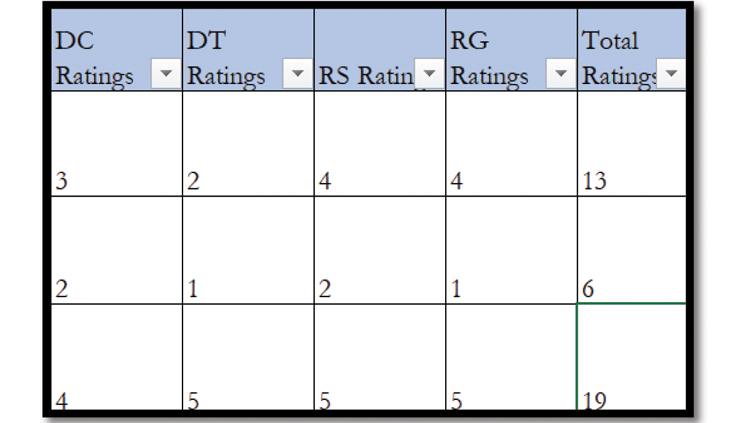
We bring the same strategy to bear when organizing the witness examinations. Here’s an oversimplified version of our “trial witness” database (See Fig 2).
This database is the primary tool we rely upon for time management throughout the trial. The direct, cross, and total time estimates help you provide the court with a meaningful overall trial estimate. It also makes it easier, when and if cuts need to be made, to incrementally and individually adjust individual witness estimates until you have brought the overall time estimate down within the trial time limits imposed by the court.
Irrespective of overall time limits, the database also makes it much easier to predict, and to give notice to the court and opposing counsel, of the next day’s witnesses at the end of each trial day. Starting with the next witness in order in the spreadsheet, we can select as many of the “total time estimate” cells as needed to get to a number that is safely above the next day’s on-the-record time.
For example, if the court will have six hours of on-the-record time the next day, we select the cells necessary to bring the number up to approximately eight hours of testimony. Now we know, and can tell opposing counsel and the court, precisely which rows/witnesses we anticipate getting to the following day.
But there’s more. We also have a set of columns where each lawyer on the team individually rates the importance of each witness on a scale of 1 to 5 (See Fig 3 on page 22).
Upon completion, we can sort the witnesses by overall rating, giving us a ready-made list of the most and least important witnesses in rank order. This, in turn, keeps us nimble and adaptable, able to make cuts to the witness list quickly and without much need for extensive discussion or debate (because the ratings already reflect a team consensus regarding relative witness importance). Importantly, though, we also avoid influencing one another’s ratings by making our individual ratings offline before entering the ratings into the shared spreadsheet on the cloud.
Once again, this is a simplified version of our witness database. We also have columns that help us track: (1) subpoena service; (2) anticipated witness order; (3) whether a witness is part of our case-in-chief, defendant’s, or both; and (4) any scheduling constraints that might apply to a particular witness. And, yet again, we create ad hoc columns as needed to track any additional witness-related data we may need for a particular case.
Of course, having time estimates and witness rankings is only half the battle. You still must complete your examinations on time, which sometimes means making on-the-fly adjustments to your planned examination in real time. Once again, we use databases to generate, organize, and make as-needed temporal adjustments to the examinations themselves.
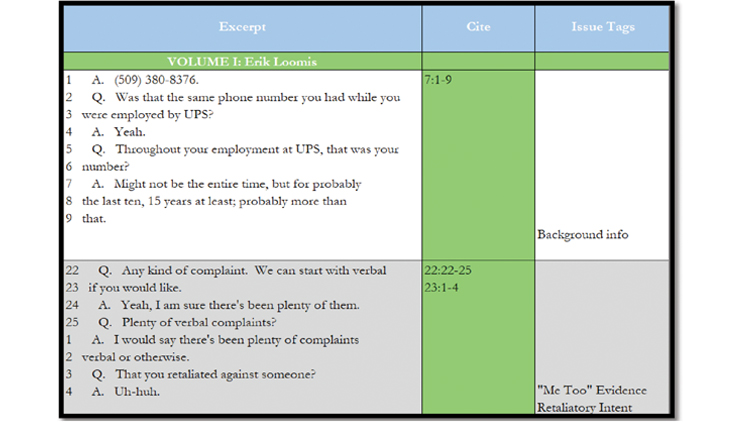
When drafting an examination for a witness who was deposed, we begin by creating a database of the deposition itself (See Fig 4 on Page 28).
This is the basic structure, and once again, we expand out with additional columns as needed to manage any data that is relevant to the case, deponent, or examination. By organizing the pertinent deposition testimony into a spreadsheet in this fashion, you can more easily sort and organize testimony by topic even when it is scattered across the entirety of the transcript or even multiple volumes of transcript. The “issue tag” column is used for this purpose, with each line/tag reflecting a theme, claim element, or other “guidepost” or “headnote” for a topical segment of the examination itself.
Once the database is completed, we use it to create what we refer to internally as an “impeachment grid.” This grid, in turn, is designed to maximize the efficiency of cross-examination by putting literally every data point the cross-examiner might need in a single document.
Here’s an excerpt from one such grid (See Fig 5 on Page 28).
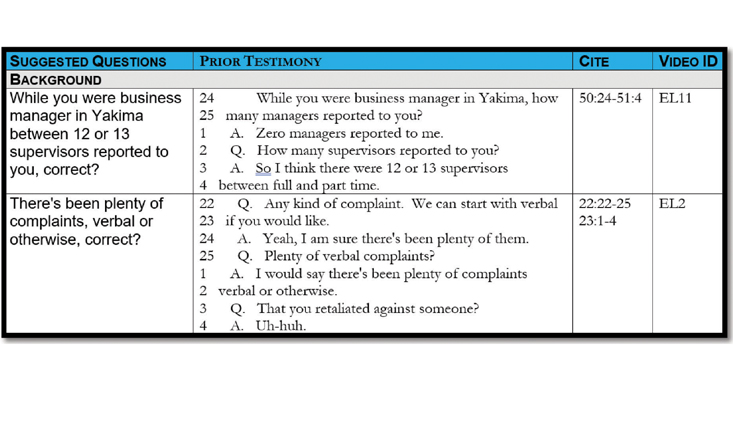
Here, we use the deposition database to organize the examination by issue tag. In this instance, we have filtered the column for all excerpts that were tagged “background” in the deposition database, ordered those excerpts in the way we deem most logical and/or persuasive, and then copied the results into the second and third columns of the “grid.”
We then use the lefthand column to convert the prior testimony into a series of leading questions, hewing as closely as possible to the witness’s precise language in the prior testimony, email, memorandum, or other source of impeachment from which the questions are being derived. If the witness gives a different response or makes an inconsistent statement, we are prepared to impeach the witness immediately and without having to turn to another document – or even to turn the page!
When we have prepared video clips for potential impeachment, as in the above example, we add a column with the video clip identifier used to cue up the appropriate clip in TrialDirector (our preferred trial presentation software), once again so we can play the clip without the need to cross-reference another document.
Structuring the exam
So, you’ve created what topics you want in your examination outline, but how do you decide what order to put the topics into? Bearing storytelling and other persuasion principles in mind, the most important guide is “primacy and recency.” “Primacy and recency” refers to the psychological phenomenon by which people tend to recall best what they hear or see first and last, whereas the content in the middle is more likely to be forgotten. Thus, we want to “start strong and end strong” by placing our two most important topics at the beginning and end of the examination.
Less important topics, by contrast, wind up in the middle. By using “primacy and recency” to guide your exam structure, you have also made it easier to cut topics or portions of a topic, in real time, during any examination that ends up running longer than you anticipated. After all, you already know exactly how you want to end, permitting you to jump to the ending at any time. When we see that an exam is moving too slowly, we can start to skip over questions or even entire topics that are not mission critical. Conversely, if the exam is moving too quickly, we can improvise with more demonstrations, exhibit callouts and read-ins, or (for the more seasoned trial lawyer) blind cross-examination.
This discussion also relates back to the witness database and our witness examination time estimates. While each examiner tends to speak at their own pace, experience and data analytics from past trials have taught our lead trial attorney (Dustin Collier) that every page of impeachment grid will result in approximately 3.5 minutes of witness testimony. In document-heavy examinations, this number might be a little higher, whereas document-light exams will tend to be a little faster. Additionally, attorneys (especially Mr. Collier) tend to increase their speed during the most climactic cross-examinations, bringing the average down to something close to two minutes per page.
The impeachment grid
You can use these rough estimates – and eventually more accurate estimates based on your own pace in your own jury trials – to draft an impeachment grid and then calculate a rough estimate of the examination’s length. However, we prefer to do it the other way around – asking how long we believe a jury should be listening to a particular witness and ensuring our impeachment grid is short or long enough to match that desired time estimate. In cases with tight time limits by the court, this is the only practical approach to preparation of the grid.
Once the examinations are drafted, we also like to rehearse them in advance of the trial to ensure our time estimates are as accurate as possible. One of the columns in our witness database is for “backup attorney/mock witness.” What this means is that each examination has been assigned to one trial attorney to conduct the examination, but we want a second trial attorney to be familiar with the examination just in case (God forbid) something happens to the first attorney and the second attorney has to pick up the examination at the last minute.
Because that second attorney needs to be familiar with the examination anyways, they will also play the witness during the exam rehearsal by the primary examiner. The second attorney should familiarize themselves with the witness at issue, including that witness’s proclivity for evasion, speaking quickly or slowly, going off on tangents, and the like. This permits them to try to mimic the individual witness’s response style as closely as possible during the mock exam, once again yielding a more accurate time estimate.
When combined with the witness rankings, “primacy and recency” structuring, and other techniques described above, you are now well-poised to finish every examination on time. More importantly, you can do so with the peace of mind that you did everything within your power to put your best foot forward within whatever time you have been allotted.
Conclusion
Our firm has created a barrister-solicitor system, which is to say that we train other attorneys and firms on our methods for discovery planning, deposition techniques and strategies, and pre-trial preparation, all before appearing as trial co-counsel. Through much trial and error, we have developed systems that assist us quickly review, organize, and present the evidence gathered by those who preceded us.
For years, we have shared these same techniques and systems with the firms we co-counsel with for trial. These are just some of the many techniques we like to utilize to put on the most efficient, persuasive, and above all moving trial presentations that we can. Combined, these techniques empower us to manage our time most effectively, to distill our story to its simplest form, and to put our best foot forward in whatever amount of time we have been allotted.
Whether you choose to adopt our systems, purchase technological tools that serve the same essential purposes, or develop something of your own, the key is to recognize that time management is largely about preparing to manage your time. That begins with taking the time to think critically about every witness and every exhibit you intend to present, resisting the urge to present everything you can and focusing instead on presenting only with what you need.
Once you master this skill, you can approach unreasonable trial time limits without fear. Indeed, we suspect you will find, as so many trial lawyers have, that rapid trials often force us to be more prepared, more concise, and therefore, more persuasive. They also ensure the jury receives the case while the proverbial iron is hot, which frequently leads to better outcomes than cases where the jury has ample time to forget evidence they received, or, most importantly, the way it made them feel.
Dustin Collier

Dustin Collier is a principal and founder at Collier Law Firm, LLP, where he represents plaintiffs in employment and personal injury disputes. He also serves as a trial and deposition skills instructor for the National Institute for Trial Advocacy (NITA), the University of San Francisco, and the California Employment Lawyers Association. His firm provides trial and jury consulting services to other lawyers. Mr. Collier has been selected to The National Advocates “Top 40 Under 40” list for California. He has been selected to Super Lawyers “Rising Stars” for Northern California four years in a row.
Drew Teti

For over a decade, Drew Teti has represented plaintiffs with a focus on victims of illegal employment practices, including discrimination, retaliation, wrongful discharge, and a variety of other torts. He also represents the catastrophically injured. A trial skills instructor along with each of his four partners, Drew is one of the founders of the “Collier Socks Method,” a barrister-solicitor system for training and trying cases with or on behalf of younger or less experienced lawyers until they are ready to try cases on their own.
Copyright ©
2025
by the author.
For reprint permission, contact the publisher: Advocate Magazine